
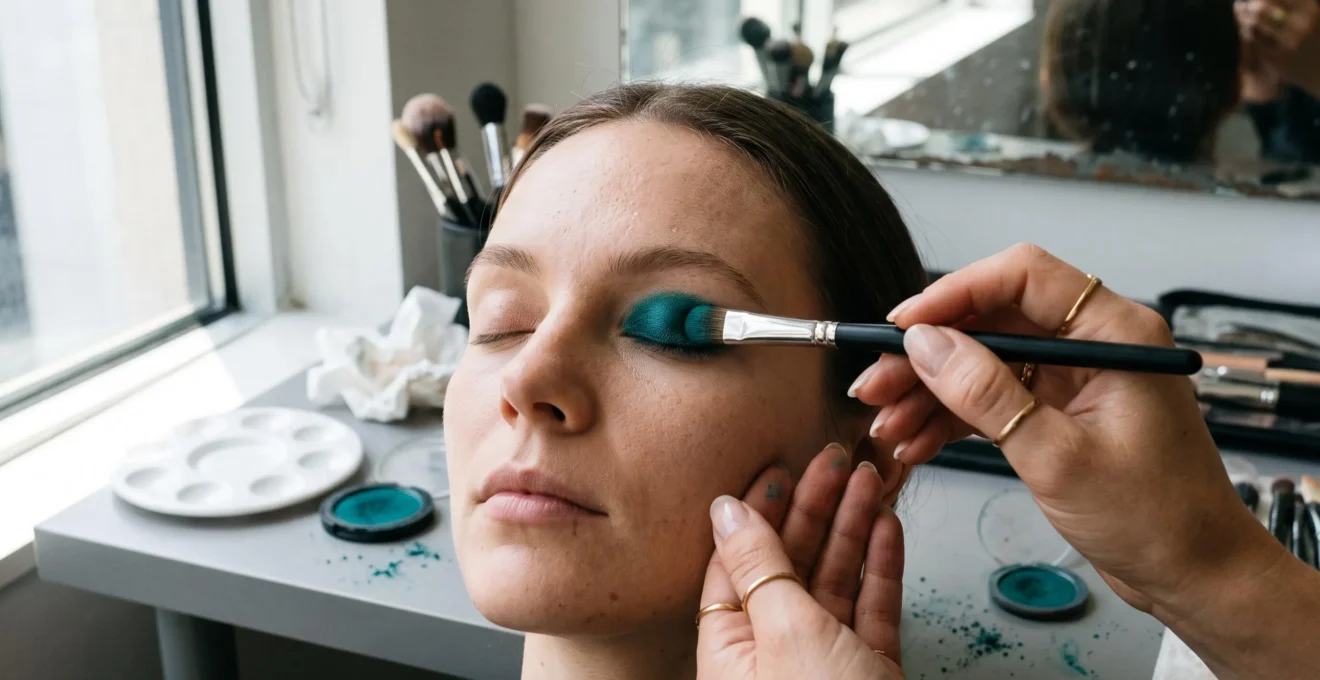
High-pigment makeup looks clean when every colour has a defined position, its edges are softened selectively, and the saturated centre remains undisturbed. The difference between a striking electric-blue eye and a patchy, greyish blend is often less about pigment quality than brush pressure, product texture and the order in which shades are applied.
Highly saturated formulas reveal mistakes quickly. A fluffy brush can carry violet into yellow, an overloaded lid can shed colour across freshly applied concealer, and an overly slippery primer can make even an expensive shadow look uneven. Adding more product rarely solves these problems.
The most reliable approach is to treat bold eyeshadow as controlled colour placement rather than continuous blending. Map the shades before touching the lid, choose a compatible base, press pigment into position and refine only the borders. Then inspect the result under the lighting in which it will actually be worn.
These techniques apply to graphic colour blocks, colourful smoky eyes, bright cut creases and expressive everyday makeup. They preserve intensity without requiring perfect skin texture, excessive layering or an unrealistic amount of application time.
How to make bold eyeshadow look precise
- Press saturated pigment onto a thin, compatible base, then blend only the outer transitions with a clean brush.
- Control fallout by matching application technique to product texture and choosing the right order for eyes and complexion makeup.
- Test colour combinations, primer behaviour and lighting before adding layers; correct gaps locally instead of repeatedly sweeping across the lid.
- Why Do Bright Shadows Turn Grey When You Blend for More Than 30 Seconds?
- How Do You Pack Pigment on the Lid Without Fallout All Over Your Base?
- Cream Pigment or Powder Shadow: Which One Lasts Longer Under Warm Indoor Lighting?
- The Primer Mistake That Makes Pigments Skip and Apply Patchy
- Should You Do Eyes Before Base When Using Heavy Pigment Looks?
- Why Do Your Eyeshadows Look Orange Indoors but Neutral in Daylight?
- Why Does High Pigment Apply Patchy on One Eye but Not the Other?
- How Do You Get Rich Colour Payoff Without Building 6 Layers?
Why Do Bright Shadows Turn Grey When You Blend for More Than 30 Seconds?
Bright eyeshadows can turn grey or muddy when repeated blending transfers neighbouring colours into each other, particularly when contrasting undertones or deeper shades overlap. The pigment has not necessarily faded: its visible colour has changed because different shades are mixing. Thirty seconds is not a scientifically established limit; brush movement and colour placement matter more than time.
Consider an electric violet beside a saturated yellow. If both colours remain in distinct zones, their contrast looks intentional. Repeatedly sweeping a brush across the border can create a muted mixture, especially where the actual formulas contain complex undertones rather than pure primary colours.
Dark brown, black or charcoal added too early can produce a similar visual effect. These shades may contaminate brighter areas and reduce their apparent clarity. The result depends on the individual pigments and their proportions, not simply on whether two colours are theoretical complements.
The correction is blend edges, not pigment. Place the dominant shade with a flat brush, keep its centre saturated, and use a separate clean fluffy brush to soften only the transition. Hold the brush near the end of the handle for lighter pressure, and avoid dragging it across the entire colour block.
For a practical demonstration of controlled placement, Chhaya Shankar Makeup Academy‘s eyeshadow application and blending tutorial explains how targeted brushwork preserves the distinction between neighbouring shades.
Before applying an unfamiliar palette, swatch the proposed neighbouring shades next to each other on clean skin or a suitable practice surface. Blend a small portion of their shared edge. If the mixture looks dull, keep the colours separated, narrow the transition or introduce a compatible intermediate shade.
Watch particularly for complementary pairs, such as blue and orange or red and green, and for combinations involving similarly deep but differently undertoned shades. Neither pairing automatically produces grey, but both deserve a quick compatibility check.
If part of the eyelid has already become muddy, stop blending. Remove excess loose product from the brush, then re-pack the original bright shade onto its intended area with a clean flat brush. If the contamination is dense or the base has become unstable, remove and rebuild that small section instead of covering it indefinitely.
The goal is not a perfectly airbrushed gradient everywhere. A controlled meeting point between two vivid colours often looks cleaner and more sophisticated than a large, indistinct transition.
How Do You Pack Pigment on the Lid Without Fallout All Over Your Base?
To reduce eyeshadow fallout, load a dense, flat brush with a manageable amount of pigment, tap away loose excess, and press the brush directly onto a prepared eyelid rather than sweeping it across the skin. A compatible, slightly gripping eye base can improve adherence. Loose or crumbly products may still require an under-eye shield or an eyes-first application order.
The mechanics are simple. Pressing transfers product into the selected area while minimising unnecessary sideways movement. Sweeping with a fluffy brush can scatter loosely held particles, especially when a shadow has a delicate, flaky or highly reflective texture.
Choose a brush with firm, closely arranged bristles for initial application. Use small overlapping presses, releasing pressure between movements. A fluffy brush belongs in the blending stage, not the first attempt to establish full colour coverage.
Texture changes the level of precaution required:
| Product texture | Typical concern | Application approach |
|---|---|---|
| Loose pigment | Unbound particles may scatter during loading and application. | Use a small amount, an appropriate gripping base and controlled pressing. |
| Pressed powder | Fallout varies with how firmly the formula is pressed and how readily it crumbles. | Tap away excess and press with a flat brush. |
| Cream pigment | Usually less airborne powder fallout, but possible smearing or transfer before setting. | Apply thinly and allow the formula to settle as directed. |
A quick preliminary test is to load the brush over a clean tissue and tap the handle gently. Visible falling particles suggest that a smaller load or additional complexion protection would be sensible. This predicts loose-particle behaviour, not the product’s overall durability.
L’Oréal Paris‘s eyeshadow fallout prevention tips recommend removing excess powder from the brush, considering cream formulas and applying eye makeup before complexion products when fallout is likely.
A thin eyeshadow primer or dedicated pigment adhesive can help hold colour in place. For suitable powder products, a brush lightly moistened with water or a manufacturer-approved mixing medium may increase contact and reduce loose dust. Avoid saturating the brush, and check that the product is approved for damp application, particularly with loose pigments or glitter.
The cleanup decision should happen before foundation. Under-eye patches can protect bare skin while applying colour. Adhesive tape should be kept away from delicate eye-area skin and should not be used over completed foundation, where removal may disturb the finish. A loose-powder barrier is another possible technique, but it can leave residue on textured or dry complexions.
Prevention is more reliable than sweeping fallen pigment off fresh concealer. Once the main colour is securely placed, the remainder of the eye look usually requires much less manipulation.
Cream Pigment or Powder Shadow: Which One Lasts Longer Under Warm Indoor Lighting?
Neither cream pigment nor powder eyeshadow automatically lasts longer under warm indoor lighting. Wear depends on the individual formula, eyelid oiliness, skin preparation, temperature and application method. Creams can adhere intensely but may crease or transfer, while powders can retain a defined finish when applied over a compatible base. Warm light changes appearance; ambient heat and skin conditions influence wear.
A heated room, prolonged wear or an oily eyelid may challenge a soft cream formula, especially one that remains emollient after application. A powder shadow may resist some movement but can fade, separate or become uneven if the surface underneath does not hold it consistently.
Choose according to both eyelid conditions and the required finish:
| Decision factor | Cream pigment | Powder shadow |
|---|---|---|
| Initial colour impact | Often provides concentrated coverage with direct placement. | Can provide strong payoff, depending on formula and base. |
| Oily or deeply creased lids | May migrate or crease unless formulated to set securely. | May be easier to stabilise with a suitable primer, but can still crease. |
| Graphic edges | Useful for precise shaping before it sets. | Useful for building controlled blocks and softened transitions. |
| Layering | Additional layers may move an unset base. | Can be pressed into place but may become dusty when overloaded. |
| Touch-ups | May require careful smoothing or local reapplication. | Often permits targeted re-pressing when the base remains stable. |
A cream-under-powder technique can combine colour intensity with a more structured surface. Apply a thin compatible cream shadow, allow it to reach the setting stage recommended for that formula, then press matching powder onto it without sweeping.
This is a technique to test, not a guarantee of longer wear. A thick, oily cream can remain mobile underneath powder, producing clumps, creasing or visible separation. Quick-setting creams may also stop gripping powder once fully dry.
To compare products under real conditions, apply cream pigment to one eye and a comparable powder shade to the other, using compatible preparation. Photograph both immediately, then check them after two, four and six hours under consistent lighting. Note creasing, colour separation, transfer and changes in saturation.
This is a personal wear test rather than a controlled scientific comparison. To reduce variables, repeat it on another day with the products switched between eyes.
When the formula remains comfortable, the colour holds its intended shape and the crease stays clean, that is a better measure of success than the product category printed on the packaging.
The Primer Mistake That Makes Pigments Skip and Apply Patchy
Applying too much eyeshadow primer, choosing an incompatible formula or adding pigment before the base has reached its intended setting stage can cause skipping and patchiness. A thick, slippery film may allow powder to move rather than grip evenly. The solution is a thin, consistent layer of primer and application timing matched to the product’s instructions.
A primer should create a suitable surface, not become another heavy layer of makeup. Spread a small amount across the area where pigment will sit, taking care around natural folds and the inner corner. Excess product can gather in creases, making one part of the eyelid behave differently from another.
Some primers are designed to feel slightly tacky when eyeshadow is applied. Others form a smoother, drier surface. There is no universally correct waiting interval, so the instruction to let every primer dry completely can be just as unhelpful as applying powder over a visibly wet layer.
For a tacky-base formula, use a gentle set-to-tacky check: the surface should no longer look wet or slide under light contact, but may retain the mild grip intended by the manufacturer. Do not repeatedly touch the lid or assume that stickiness is desirable for every formulation.
Concealer can sometimes work as an eye base, particularly when a product has suitable coverage and sets well. However, a rich concealer that remains emollient may encourage movement or creasing when layered with powder. This is a compatibility issue, not evidence that concealer inherently repels eyeshadow.
Vogue‘s eyeshadow primer article featuring makeup artist Min Sandhu discusses how specialised primers can support colour intensity and reduce creasing, while highlighting differences between primer textures and film-forming ingredients.
Five checks before packing high-pigment eyeshadow
- Check the lid surface: remove unwanted skincare residue and confirm that both lids feel similarly prepared. Deliverable: two clean, comfortably dry eyelids.
- Apply primer evenly: spread a thin layer without visible pooling around folds. Deliverable: a consistent base across both colour-placement areas.
- Confirm primer readiness: follow the formula’s instructions and check for the intended surface finish. Deliverable: no visible wet patches or product gathering.
- Test pigment adhesion: press a small amount onto one intended area without dragging the brush. Deliverable: an even test patch with a defined colour boundary.
- Compare both eyes: repeat the same application technique and check placement in the mirror. Deliverable: matching test patches ready for full coverage.
When working eyes-first, keep foundation and rich skincare from migrating onto the primed lid during subsequent complexion application. Protecting the preparation is just as important as selecting the primer.
A stable, evenly prepared eyelid allows colour placement to become predictable. That consistency is what makes bold pigment appear deliberate rather than improvised.
Should You Do Eyes Before Base When Using Heavy Pigment Looks?
Doing eye makeup before foundation is usually the more practical choice when using loose pigments, crumbly shadows or glitter-heavy eye products because fallout can be removed without disrupting finished complexion makeup. Base-first application remains reasonable for pressed shadows with minimal fallout or carefully controlled cream formulas. The right order depends on texture, cleanup risk and personal technique.
Eyes-first application offers a useful working window. Loose particles can be brushed away from bare skin or removed with a suitable gentle cleanser before foundation and concealer are applied.
That flexibility becomes especially valuable when working with saturated blues, greens or reds that could visibly stain or smear a completed complexion. It also allows precise cleanup around a graphic wing or sharply defined outer corner.
However, eyes-first does introduce complications. Moisturiser, sunscreen or a rich skincare product may migrate onto the lid after primer application. Foundation subsequently blended too high around the eye can disturb the finished shadow edge.
The sequence should therefore be intentional:
- Complete the necessary skin preparation, allowing products to settle and keeping excess skincare away from the eyelids.
- Apply a suitable eye primer and construct the high-pigment look.
- Remove fallout carefully without rubbing the eye area.
- Apply foundation and concealer around the finished eye makeup using controlled brush or sponge placement.
- Refine the complexion-to-eyeshadow boundary with a clean, small tool if needed.
For base-first makeup, first test whether the chosen shadow sheds appreciably. Low-fallout pressed powders can be applied over a completed complexion with careful brush loading. A clean under-eye shield may provide protection if it does not adhere to or disturb the makeup beneath.
The reverse risk is significant: when powder falls onto freshly applied concealer, repeated cleanup can remove coverage, smear colour or create a patchy under-eye finish. Correcting that damage may require redoing a portion of the base, which can take more effort than applying the eyes first.
A practical decision rule is loose pigment or substantial fallout: eyes first; low-fallout pressed colour: either order. Glitter and other particles used near the eyes should always be specifically approved for the eye area. Craft glitter is not an acceptable substitute.
Whichever order is chosen, protect the work already completed. A clean finish depends as much on avoiding unnecessary corrections as on the original colour application.
Why Do Your Eyeshadows Look Orange Indoors but Neutral in Daylight?
Eyeshadow can appear noticeably warmer indoors because artificial light and daylight have different spectral characteristics. Under some warm bulbs, yellow, red and orange undertones in makeup and skin become more prominent, changing the perceived balance of a shade. This is a lighting-dependent appearance shift, not necessarily pigment oxidation or a change in the eyeshadow itself.
Colour is not perceived independently of illumination. The wavelengths produced by a light source interact with the wavelengths reflected by the skin and cosmetic pigments. Two light sources with different spectral outputs can therefore make the same makeup look different.
Warm incandescent or LED lighting may make a neutral brown read as terracotta or bring out peach undertones that were subtle in daylight. The exact response depends on the bulb spectrum, the pigment formulation and surrounding colours. Not every warm light produces the same shift.
The technical distinction matters: colour inconstancy describes changes in how an individual colour appears under different lighting, while metamerism concerns two samples that match under one illuminant but no longer match under another. A single shadow appearing orange indoors is not, by itself, proof of metamerism.
When designing a look for an indoor event, swatch likely crease and transition shades under both daylight and the actual artificial lighting available. If a warm transition overwhelms the main colour, try a more neutral or cooler alternative, provided it complements the intended palette.
The objective is not to neutralise every warm shade. It is to predict how the chosen colours will behave together. A deliberate orange-and-cobalt composition may benefit from warmth; a neutral violet-and-taupe look might need tighter control of yellow or orange undertones.
A useful home test is to apply small swatches of frequently used colours, inspect them near a daylight-facing window, then check them under bathroom or dressing-area lighting. Record which shades appear warmer, cooler, duller or more saturated. Repeat the comparison on your own eyelid when possible, since surrounding skin tones influence perception.
For a technical explanation of why lighting changes colour appearance, Konica Minolta Sensing describes the relationship between illuminant spectra, reflected light and standard colour references. Its discussion concerns colour science generally rather than experimental testing of cosmetic eyeshadows.
Warm light can also make closely related shades appear less distinct. When the separation between two colours becomes difficult to judge, the temptation is to blend more aggressively. That may introduce actual colour mixing and create the muddiness that was not present before.
Check the finished look in at least two lighting conditions, then adjust only the shades that genuinely shift in an unwanted direction. Colour correction should be based on observation rather than assumptions about warm and cool undertones.
Why Does High Pigment Apply Patchy on One Eye but Not the Other?
High-pigment eyeshadow can look patchy on only one eye because eyelid texture, primer distribution, skincare residue, brush angle or hand pressure differs between sides. Full-coverage formulas make these small inconsistencies more visible than sheer shadows do. The most effective correction is to identify the uneven variable and standardise application rather than repeatedly adding product to the patchier eye.
Begin by comparing both lids before applying colour. One eyelid may have a more pronounced fold, a different degree of hooding or slightly drier skin. These differences are normal and may require small changes in placement rather than forcing both eyes into identical physical shapes.
Technique is another common source of asymmetry. A dominant hand may press more firmly or hold the brush at a different angle when crossing the face. The same movement can deposit more pigment onto one eye while leaving small gaps on the other.
A quick diagnostic separates the likely causes:
- Colour skips in the same crease: inspect primer buildup, natural folds and product movement.
- One eye receives a wider colour block: compare the brush angle and placement while both eyes are open.
- Coverage varies across a smooth area: check brush loading, pressure and leftover skincare.
- Patchiness appears after blending: investigate repeated sweeping and cross-contamination from neighbouring shades.
To improve consistency, use the same brush and comparable product loading on both sides. Position the mirror at eye level, then check placement with eyes open and relaxed. Work in small corresponding areas rather than finishing an entire eye before beginning the other.
A useful personal technique is to establish placement on the eye that feels harder to control, then match the easier eye to it. Use a similar number of presses as a consistency cue, but do not treat a fixed press count as a scientifically proven requirement for symmetry.
When one side has a missing patch, use a small clean brush to press pigment directly into that gap. A brush lightly dampened with a product-compatible medium may help for suitable powder formulas, but it should not saturate the lid or lift the existing base.
Avoid blending across the entire eye to disguise one isolated problem. That can turn a small correction into a larger muddy area.
Symmetry in bold makeup is primarily about balancing visible colour placement when the face is relaxed. It does not require both eyelids to have identical anatomy or every brush movement to be mechanically identical.
Key takeaways before building maximum colour
- A saturated shadow needs a stable base and a deliberate placement area before additional layers can improve its appearance.
- Brush pressure, loading and the condition of each eyelid are more useful variables to control than the number of passes alone.
- When colour stops becoming visibly richer, refine the edge or correct a specific gap instead of sweeping more powder over the entire lid.
How Do You Get Rich Colour Payoff Without Building 6 Layers?
Rich eyeshadow payoff usually comes from a compatible base, a densely packed brush and deliberate pigment placement rather than numerous thin layers. Press the first pass into the intended area, then intensify only sections that need more saturation. When an additional press no longer produces a meaningful improvement, stop; repeated sweeping can disturb previous layers and muddy the result.
Building six layers may seem like a cautious way to increase intensity, but each new application introduces the possibility of lifting the previous one. The brush can move pigment into neighbouring zones, expose patches of primer or mix undertones that were initially distinct.
A more controlled approach uses a two-pass structure. The first pass establishes shape and initial coverage. The second concentrates additional pigment where colour density is insufficient, typically the centre or another deliberately selected focal area.
Both passes should be pressed into place rather than swept repeatedly across the lid. The surrounding edge can then be softened separately with a clean brush.
There are several ways to influence visible payoff, each with different trade-offs:
| Technique | Potential advantage | Important limitation |
|---|---|---|
| Dense flat brush | Concentrates pigment in the chosen area with precise contact. | Requires careful pressure and placement to avoid sharp unwanted marks. |
| Lightly dampened brush | May improve the appearance and adherence of compatible powders. | Can create hard patches or damage formulas not intended for damp use. |
| Dedicated mixing medium | Can alter adhesion and enable more controlled application when approved for the product. | Performance depends on medium compatibility and appropriate eye-area use. |
| Compatible cream base | May increase initial opacity and provide additional grip for powder. | An overly emollient layer can crease or cause powder to separate. |
Choose one intensification method based on the formula instead of combining every technique. A highly pigmented matte powder may need nothing beyond a flat brush and a suitable primer. A loose metallic pigment may benefit from a dedicated eye-safe adhesive or compatible mixing medium.
The stopping criterion is visual rather than numerical: compare the central colour after the first and second controlled passes under consistent light. If saturation no longer increases appreciably, a third application is unlikely to solve a structural problem with the base or placement.
At that point, inspect the boundaries. A saturated centre against a carefully controlled transition usually reads as more impactful than a heavily layered lid with inconsistent edges.
For an example of how these techniques work together, imagine a hypothetical cobalt-blue eye look with a violet outer corner. Press cobalt into the lid, add a targeted second pass where needed, then use a separate clean brush at the violet boundary. The two colours remain individually identifiable while the transition looks intentional.
For your next bold eye look, choose two main colours, test their interaction, prepare both lids evenly and complete the design with controlled pressing before considering more layers. Judge the result by clarity, comfort and intentional contrast—not by how much pigment the brush can hold.
Can highly pigmented eyeshadow look clean on textured eyelids?
Yes. Natural folds and texture do not prevent precise colour placement. Use a thin, compatible primer, avoid excessive layering and check the position of the shadow with your eyes open. A more controlled colour block often looks cleaner than trying to erase texture through additional product.
Do you need an expensive eyeshadow palette for vivid colour payoff?
Not necessarily. Price alone does not establish how evenly a shadow applies or how long it lasts. Formula compatibility, brush choice, skin preparation and placement all affect the result. Test the pigment’s adhesion, colour clarity and wear before deciding whether a different product is necessary.
Should you set eyeshadow primer with powder before applying bright colours?
It depends on the primer and desired finish. Setting a smooth base may help certain shadows blend, but a gripping base intended for direct pigment application may lose some of its adhesion when covered with powder. Follow the primer’s directions and test the combination on a small area first.
How do you clean up a sharp eyeshadow edge without ruining the colour?
Use a clean, precise tool to correct only the outer boundary. For substantial corrections, a small amount of suitable makeup remover on a controlled applicator can help before complexion makeup is applied. Allow the area to dry and reprepare it if necessary. Avoid dragging remover or concealer into the saturated centre.
Can you combine matte and metallic high-pigment shadows without making the look messy?
Yes. Establish the matte shade’s position first, then press the metallic formula onto a separate, clearly defined area with an appropriate brush or applicator. Avoid sweeping metallic particles through the matte transition. Check that the product is intended for eye-area use and that both textures work with the chosen base.