
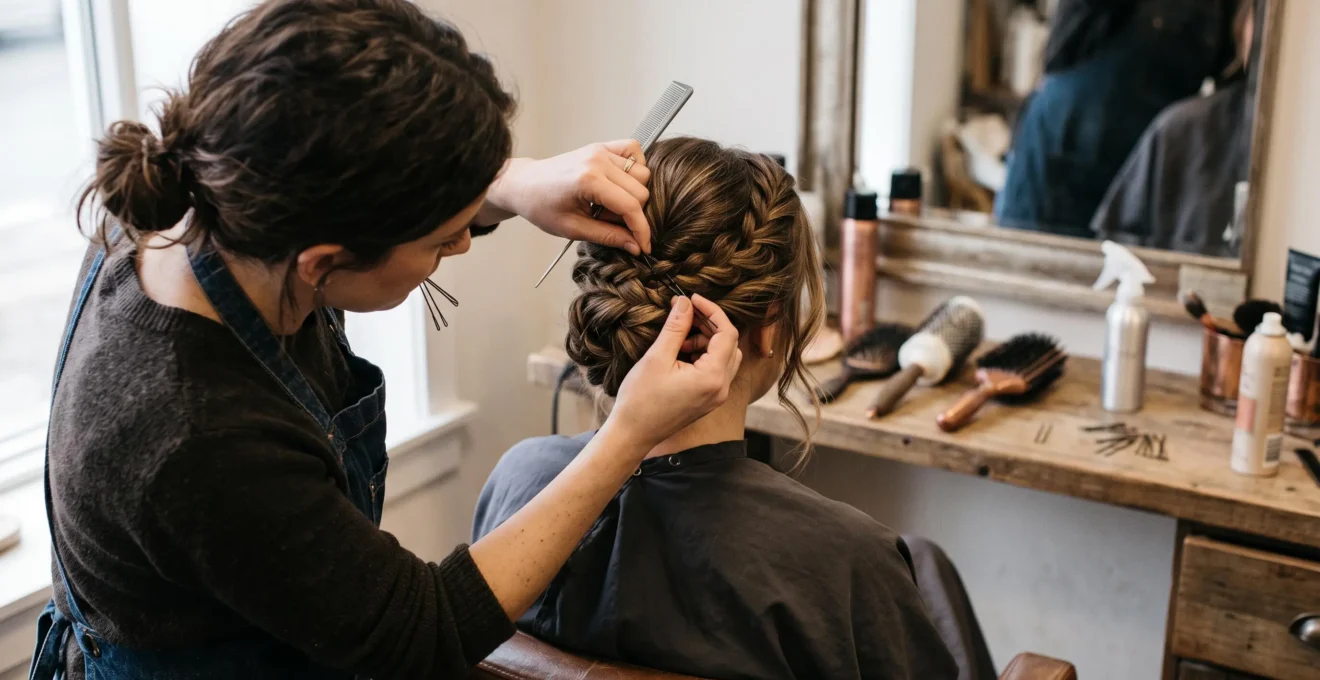
An intricate updo can look immaculate at the beginning of an event and still become uncomfortable or lose its shape before the evening ends. The solution is not simply to add more hairspray or push in extra pins. A dependable six-hour style needs a stable internal foundation, strategically placed fastenings, controlled weight distribution and a finish that allows the hair to move naturally.
Preparation matters as much as the final arrangement. Hair texture, density, length, product residue and the weight of decorative accessories all influence how a style behaves. A smooth chignon on fine hair requires a different construction from a voluminous braided updo on thick hair, even when both need to survive a wedding, formal dinner or long celebration.
Comfort is equally important. A hairstyle should feel secure without pulling painfully at the hairline or concentrating excessive tension around the crown. The American Academy of Dermatology warns that persistently tight hairstyles can damage hair follicles; pain is a reason to loosen a style, not something to endure for the sake of appearance. Although no technique can guarantee six hours of perfect hold, a carefully constructed base and a realistic movement test can substantially improve the chances of success.
The essentials of a secure, comfortable updo
- Build an internal foundation before adding decorative sections, using pins suited to the hair and the weight they must support.
- Distribute the hairstyle’s weight and keep the scalp comfortable instead of pulling everything tightly towards one anchor.
- Test the finished style with ordinary movements, then make small, targeted adjustments rather than adding pins indiscriminately.
- Why Do Intricate Updos Feel Secure at First, Then Slide After an Hour?
- How Do You Build an Updo Base That Holds Even on Clean, Slippery Hair?
- Bobby Pins or U-Pins: Which One Holds Better in Thick Hair?
- The Weight-Placement Mistake That Causes Updo Headache in 30 Minutes
- When Should You Do an Intricate Updo Before an Event to Avoid It Going Flat?
- Backcombing or Padding: Which Updo Base Looks Cleaner on Camera?
- Sleek Low Pony or Soft Waves: Which Looks More Polished for a Work Dinner?
- Which Elegant Hairstyle Looks Expensive Without Taking More Than 20 Minutes?
Why Do Intricate Updos Feel Secure at First, Then Slide After an Hour?
An intricate updo can feel secure initially because the sections are freshly arranged, the pins are holding the hair in position and styling products may add temporary grip. As the wearer moves, however, individual strands can shift, folded sections can settle and the hairstyle’s weight can begin to pull against its anchors. Humidity, natural hair texture and product choice can also affect the result. Early movement is a reason to inspect the construction, not automatically to tighten the entire style.
The first distinction is between hair gripping hair and pins securing a section within the foundation. When a pin merely traps two loose surface sections together, a small movement can release their tension and allow neighbouring strands to slide. A more reliable construction uses strategically placed pins to secure internal folds, twists or supporting sections. Professional guidance published by MODERN SALON’s professional updo construction article emphasises preparation, internal pinning and surface polishing as distinct parts of a long-lasting occasion style.
Movement can expose weak points around the nape, crown or sides, but there is no universal sequence in which every updo begins to loosen. The location depends on the design, the hair’s density, the direction of the pull and how the sections were secured. Product buildup can complicate matters too: excessive dry shampoo or hairspray may leave a rough, dusty or flaky finish rather than a clean, workable texture.
A useful pre-event test is to spend approximately 15 minutes moving naturally. Sit down, stand up, walk, turn the head, lean forward and return upright. If appropriate, practise a gentle hug or the head movements likely to occur while dancing. Check the nape, crown and front hairline for newly exposed gaps, slipping folds or pins that have migrated. This is a practical stress test, not a scientifically validated guarantee of six-hour durability.
If the same section repeatedly loosens, rebuild its support instead of masking the problem with a heavier spray. A stable foundation should carry the hairstyle before the visible surface is polished.
How Do You Build an Updo Base That Holds Even on Clean, Slippery Hair?
Clean, slippery hair can hold an intricate updo when the foundation creates enough structure for the pins to engage with. Second-day hair may offer a more textured starting point, but freshly washed hair is not automatically unsuitable. The important factors are controlled preparation, an appropriate construction method and secure internal anchoring. Rather than relying on a tight pull, build folded or twisted sections that can be fastened into a stable framework.
Start by assessing the hair’s density, natural movement and intended shape. If the hair is freshly washed and unusually smooth, apply a light texturising product according to its instructions, concentrating on the root area and the sections that will form the foundation. Avoid coating the hair in multiple layers of dry shampoo and hairspray in an attempt to manufacture grip. The result should remain workable, not sticky or difficult to separate.
Next, prepare the hair according to the design. Curling and setting can make sections easier to arrange; a professional method described in MODERN SALON recommends allowing curls to cool before constructing the updo. Its suggested cooling period is at least 30 minutes, but this is a stylist’s procedure rather than a universal requirement for every hair type or style.
Before adding decorative details, establish an anchor grid: identify several suitable internal fastening areas around the head, taking the design and the hair’s natural direction into account. Three or four planned positions can be a useful starting concept, not a prescribed number for every updo. The goal is to avoid asking one small section to support the entire hairstyle.
A tension base pulls hair firmly towards a gathering point. A compression base instead folds, twists or packs sections into a shape that can be secured internally. A sleek ponytail may depend more heavily on directional tension, whereas a textured chignon can benefit from a compact foundation that supports the visible folds. Rope twists and braids also create a defined structure through which pins can be placed deliberately.
Build the updo section by section. Secure the internal foundation first, then arrange the outer hair to conceal the fastenings. This allows the visible surface to remain softer without sacrificing the structural support underneath.
Five checks for a dependable foundation
- Assess the hair’s density, length and texture; record which sections need extra support.
- Prepare the root area and nape with a suitable, lightweight texturising product if needed; check that the hair remains workable.
- Mark the planned internal anchor positions; confirm that no single point is expected to carry the whole style.
- Construct and pin the supporting twists, folds or rolls before adding decorative surface sections; inspect the foundation for exposed gaps.
- Complete the style and carry out a movement test; note any section that shifts and reinforce that specific area.
The most durable construction is not necessarily the tightest one. It is the one that supports the chosen shape through deliberate sectioning, internal fastening and a finish that remains comfortable throughout the event.
Bobby Pins or U-Pins: Which One Holds Better in Thick Hair?
In thick hair, U-pins are often useful for securing substantial folds, rolls and loosely arranged masses, while bobby pins are well suited to trapping smaller sections close to the scalp. Neither type is universally stronger in every situation. The best choice depends on the density of the section, the shape being secured, the pin’s size and how it is inserted. Many intricate updos benefit from using both types for different jobs.
A bobby pin typically clamps hair between its two arms. A U-pin has an open, elongated shape that can be woven into a thicker section to support a fold without flattening the entire shape. That distinction matters when building a voluminous chignon: a tightly clamped surface can look compressed, while a carefully positioned U-pin can help support the interior of a roll.
Use the following comparison as a starting point rather than a mechanical strength ranking.
| Factor | Bobby pins | U-pins |
|---|---|---|
| Hair density | Useful for fine sections and controlled surface placement. | Often practical for dense, folded or voluminous sections. |
| Placement | Suitable for securing small sections close to the scalp and tidying the perimeter. | Useful within internal rolls, twists and fuller sections. |
| Shape and finish | Can clamp sections firmly and conceal small flyaways. | Can support a shape without tightly compressing every strand. |
| Heavier sections | Several carefully placed pins may be needed, depending on the construction. | Multiple well-positioned pins may distribute support across a larger section. |
Crossed bobby pins can improve support when a section needs to resist movement in more than one direction. Insert the first pin to secure the fold, then position the second across its path so the two work together. The arrangement should engage with the supporting hair rather than merely overlap on the surface.
Pin orientation requires some care. Hairstylists do not agree on a single universal rule for whether the ridged side should face towards or away from the scalp. Allure’s hairstylist advice on bobby-pin placement documents these differing approaches. Follow the design, the pin’s construction and the technique that gives a secure hold without scratching the scalp or pulling painfully.
Regardless of pin type, avoid pushing a fastener into a section without engaging the supporting hair. If a pin slips out immediately, reassess its placement, the section’s density and the direction of movement. Adding more pins at the same ineffective angle may simply create bulk without improving stability.
A well-built updo uses pins as part of a coordinated structure. The objective is controlled support, not a large number of visible or uncomfortable fastenings.
The Weight-Placement Mistake That Causes Updo Headache in 30 Minutes
A common source of discomfort is concentrating too much pulling force at one small point, particularly when heavy sections are gathered tightly at the crown. The scalp then experiences sustained tension rather than support distributed through the hairstyle. A painful updo should be loosened, not endured in the hope that it will become comfortable. There is no universal 30-minute threshold for headache, and discomfort can begin at different times depending on the person and the construction.
Consider where the weight sits. A large rolled section or substantial braided arrangement can pull continuously on the area holding it in place. If most of that weight is suspended from one tightly drawn section, the wearer may feel increasing soreness around the crown, temples or hairline. The precise location depends on the direction of the pull and the way the hairstyle is constructed.
A more considered approach distributes support across multiple suitable sections. Rather than gathering everything into a single tight anchor, secure the internal foundation at several positions that work with the style’s shape. Three separate support areas at different heights may be useful for some designs, but this is a practical construction option, not a medically validated formula or a guarantee against headaches.
Pay attention to discomfort during styling. A sensation of persistent pulling above the ears, pain around the hairline or tenderness where a section is fastened is a reason to pause and reassess. Visible scalp tenting or stinging also warrants attention. The American Academy of Dermatology guidance on hairstyles that pull identifies painful, tightly pulled hairstyles as a warning sign and explains that repeated traction can contribute to hair loss.
The aesthetic trade-off is straightforward: a very sleek finish can tempt the stylist to increase tension, but comfort requires a softer construction. Firm internal support and relaxed surface sections can create a polished appearance without making the scalp bear unnecessary strain.
If the style hurts, loosen the affected section and redistribute the support. Do not try to solve pain by adding more pins or spraying the hairstyle more heavily.
Comfort is part of durability. An updo that remains visually intact but causes persistent pain is not a successful six-hour style, and recurring tension should not be treated as an acceptable cost of formal styling.
When Should You Do an Intricate Updo Before an Event to Avoid It Going Flat?
The best timing depends on the hair type, the complexity of the style and how long it must last. Fine, very smooth hair may lose volume quickly, making a same-day finish preferable. Thick or naturally textured hair may benefit from having time to settle before the event. A practical compromise is to prepare the internal structure ahead of the final finishing stage, then complete the visible details closer to departure.
Two considerations compete when scheduling an updo. The first is structural stability: the longer a style is worn, the more opportunity there is for movement, humidity and ordinary activity to affect its shape. The second is visual refinement: freshly arranged sections can sometimes look overly rigid, while a little natural settling can soften the finish.
These effects are not identical for every hair type. Fine hair may lose lift as the style settles, whereas thick or textured hair may maintain substantial volume but reveal a sharper, more constructed outline immediately after styling. The desired shape matters too. A sleek chignon and a soft, voluminous updo may benefit from different finishing schedules.
For a long wedding or formal event, consider separating construction from finishing. Establish the supporting twists, internal rolls and anchor points first. Allow the hair to settle while checking that the foundation remains secure, then refine the surface, conceal the pins and add the final accessories closer to the event. This approach preserves time for corrections without leaving every delicate detail exposed to hours of movement.
There is no universally optimal number of hours between styling and departure. Use the style’s complexity and the hair’s behaviour as your guide. If the hairstyle must be completed well in advance, test the foundation under realistic movement before committing to the final appearance.
Overnight preparation is a different proposition. Sleeping can flatten sections against the pillow and move fastenings, so an updo that survives the night may still require substantial rebuilding. When preparation the evening before is unavoidable, treat the existing structure as a starting point and reassess the surface details rather than assuming a light touch-up will restore the original result.
Plan enough time for a movement check and targeted corrections. The best schedule is the one that gives the foundation time to prove itself while keeping the visible shape fresh for the occasion.
Key takeaways
- Choose a volume method that suits the hair’s natural density and the finish required in photographs.
- Make the visible silhouette smooth without allowing a padding form or backcombed section to become obvious.
- Consider the event itself: prolonged sitting, dancing and frequent movement can call for different finishing and touch-up strategies.
Backcombing or Padding: Which Updo Base Looks Cleaner on Camera?
Backcombing and padding can both create volume, but they produce different foundations. Backcombing uses the hair itself to build lift and texture, while padding provides a separate form that the hair is arranged over and pinned into place. Padding can help create a smooth, defined silhouette; backcombing can blend more naturally into the surrounding hair. Neither method guarantees a cleaner result in every photograph, because the finish depends on coverage, lighting, hair texture and construction.
Backcombing is useful when the desired shape needs internal bulk without a separate form. It can provide a natural-looking base for twists and folds, but rough sections and flyaways may become more noticeable if the surface hair is not smoothed carefully. Excessive teasing can also make the hair harder to arrange neatly or remove at the end of the event.
Padding is particularly useful when a style requires a consistent, rounded silhouette. The form must be securely attached and fully concealed, with enough surrounding hair to cover its edges. A professional demonstration in MODERN SALON shows how a padded special-occasion updo is constructed: the pad is pinned into position, the hair is arranged over it and the form is concealed before the finish is applied.
A hybrid method can be effective for photographed occasions. Use a small pad to establish the outline, then arrange a controlled layer of hair over it to soften the edges. Light backcombing may help support that covering layer where needed, but the amount should be limited to what the design requires.
Before leaving, take photographs with and without flash from the front, side and slightly above. These views help reveal exposed padding, uneven volume, visible fastenings and rough sections that may be difficult to spot in a mirror. They are a practical visual check, not proof that one technique always photographs better than the other.
Maintenance differs as well. Backcombed volume can gradually settle, while a padded foundation can retain its outline but shift if its fastenings loosen. If the event includes dancing, inspect the structure and its attachment points rather than assuming that the original silhouette will remain unchanged.
For the cleanest result, prioritise secure attachment, complete concealment and a smooth surface. The quality of the finish matters more than the choice of foundation alone.
Sleek Low Pony or Soft Waves: Which Looks More Polished for a Work Dinner?
A sleek low ponytail usually communicates structure and deliberate grooming, while soft waves create a more relaxed and approachable impression. For a career-focused work dinner, a polished ponytail may complement a tailored outfit; for a team celebration or informal gathering, waves may feel more natural. The best choice depends on the setting, the desired message and how the hairstyle is likely to look after several hours.
A sleek low ponytail offers a clean outline with relatively little visual complexity. Its success depends on a smooth crown, a controlled hairline and a tidy base that conceals the elastic. However, the style gathers its weight into one main attachment area, so the ponytail’s length and density should be considered when planning the support. Pulling the crown too tightly can create discomfort, and a perfectly sleek surface may make regrowth or displaced strands more noticeable.
Soft waves distribute visual interest across the hair rather than concentrating it in one smooth shape. They can relax gradually over the course of an evening without necessarily looking untidy. Their performance still depends on preparation and hair texture: waves that are very loose at the outset may lose definition, while heavily set waves may initially look more structured than intended.
The same principles used in an intricate updo apply to both styles. Secure the base without unnecessary tension, consider how much weight the hair carries and avoid relying on surface product to compensate for weak construction. For a ponytail, the attachment point needs particular attention; for waves, the emphasis is on consistent preparation and a finish that allows the shape to soften naturally.
A hybrid option combines a smooth, low gathering with soft waves through the tail and a few deliberately relaxed face-framing pieces. The result keeps the structure of a ponytail without making the overall look severe. Wrapping a small section of hair around the elastic also conceals the fastening and creates a more considered finish.
Polish does not depend on maintaining absolute smoothness all evening. A deliberate shape, a concealed fastening and a comfortable base are often more effective than continually tightening or reworking the hair.
Which Elegant Hairstyle Looks Expensive Without Taking More Than 20 Minutes?
An elegant hairstyle can look refined in under 20 minutes when its shape is simple, the hair is prepared and the finish is deliberate. A twisted low chignon, a simplified French twist or a polished low ponytail can all create a formal impression without elaborate construction. The key is to work with the hair’s natural texture, secure the main shape efficiently and spend the remaining time concealing fastenings and refining the surface.
A twisted low chignon is a practical choice for hair that can be gathered into a compact shape. Twist the hair into a low roll or knot, secure the structure with a few carefully positioned pins and leave only a small number of intentional loose pieces around the face. The exact time required depends on hair length, density and experience, so the 20-minute limit is a planning target rather than a guaranteed result.
A simplified French twist suits hair long enough to fold and secure vertically at the back of the head. Gather the hair, create the twist, tuck the ends into the fold and fasten the structure from within. A low ponytail is often the simplest option when time is limited: gather the hair smoothly, secure it at the nape and wrap a small section around the elastic. For a softer result, add waves to the tail or leave a few face-framing strands.
Use the anchor-grid principle without overcomplicating it. Identify two or three structural fastening areas appropriate to the style, secure the main fold or gathering first, and add pins only where the shape needs support. A lightly textured base can make the hair easier to arrange, but there is no need to create elaborate backcombing if the hair already has enough body.
The final details make the difference. Conceal elastics beneath wrapped hair, check that pins are not visible, smooth stray strands with a suitable finishing product and avoid concentrating heavy spray in one area. Controlled shine or controlled softness generally looks more intentional than an uneven combination of slick sections and flyaways.
Before choosing a style, consider whether the hair can form the desired shape naturally. A simplified design that works with the existing texture will usually be easier to finish neatly than a complicated style that requires extensive preparation.
Choose one simple silhouette, allow time for a quick comfort and movement check, and refine only the details that affect the overall finish. A hairstyle that looks considered and feels comfortable is a stronger choice than one that requires constant adjustment throughout the event.
Can an intricate updo really last for six hours without extra pins?
It is possible for a well-constructed updo to last through a long event without additional pins, but no technique guarantees this result for every hair type or activity level. A secure foundation, suitable fasteners, controlled product use and a movement test improve the chances of success. Keep a few spare pins available in case a specific section needs attention.
Should hair be washed on the day of a wedding updo?
Not necessarily. Some hair is easier to style when it has a little natural texture, while other hair works well immediately after washing and preparation. Follow the stylist’s instructions for the intended design and use a suitable texturising product when needed. Avoid excessive product buildup, which can make the finish harder to manage.
How can an updo be made more comfortable without losing its shape?
Reduce unnecessary pulling, redistribute support across suitable sections and secure internal folds rather than relying entirely on a tight gathering point. If the hairstyle hurts, loosen it and reassess the construction. The American Academy of Dermatology identifies pain and scalp stinging as warning signs that a hairstyle may be too tight; persistent discomfort should not be ignored.
Are U-pins always better than bobby pins for thick hair?
No. U-pins can be useful for supporting thick rolls and larger sections, while bobby pins can secure smaller sections and keep hair close to the scalp. The best option depends on the hairstyle, the section’s density and the pin’s placement. Using both types strategically is often more practical than relying on one throughout the style.
What should be done if an updo starts slipping during the event?
Identify the section that has moved, check whether its supporting fold or pin has loosened and reinforce that specific area if possible. Avoid pulling the entire hairstyle tighter or applying excessive spray to hide the problem. If the style is painful, loosen the affected area first. A small, targeted correction is generally preferable to adding fastenings indiscriminately.